How to Add a Sitemap to Google Search Console (Step-by-Step)
What is sitemap?
The sitemap is a key component of search engine optimisation (SEO) that cannot be disregarded. The main pages of your website are included in an sitemap, which is a file that search engines like Google may use to better comprehend and index your content. This tutorial will show you how to create a Blogger sitemap to your Google Search Console if you use Blogger and want to increase your site's visibility and search engine performance.
Sitemaps: What They Are and How Important They Are
An sitemap essentially serves as a road plan for search engines to follow when they index the content of your website. It contains important details about your pages, such as their most recent change, ranking, and connections to other pages. This helps search engines index your website more quickly, which could ultimately improve search engine ranks and visibility.
Step 1.Create your Blogger sitemap as the first step.
1.Enter your Blogger login information.
2.Visit your blog's "Settings" tab.
3.Choosing "Search preferences."
4.The "Custom robots.txt" option may be found in the "Crawlers and indexing" section. The "Edit" link is located next to it.
5.There will be a pop-up window. The "Enable custom robots.txt content" checkbox should be selected.
6.Copy and paste the next line into the text box provided: User-agent: * Prohibit: Sitemap: Your Blog URL on Blogger: http://feeds/posts/default?order by=UPDATED
Change "your blog url" to the URL of your actual blog.
Restore the changes.
Step 2: Add Your Blog to Google Search Console (if not done already)
1.Visit the Google Search Console page.
2.Go to your Google account and log in.
3.To add a new property (your blog) to the Search Console, click the "+" symbol.
4.Enter the URL of your blog (for example, http://yourblogurl.blogspot.com) by selecting the "URL prefix" option.
5.Use one of the options offered (HTML file upload, HTML tag, domain name provider, or Google Analytics) to prove your ownership.
Step 3: Submit Your XML Sitemap
1.Select your blog property from the Google Search Console panel.
2.Click on "Sitemaps" in the "Index" section on the left-hand side.
3.The "Add/Test Sitemap" button should be clicked.
In the text field, type atom.xml?redirect=false&start-index=1&max-results=500 and then press "Submit."
Second Method
 |
| Copy Blog Url |
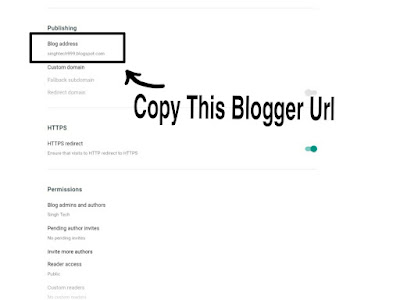
Step 1. Copy Your Blogger Url.
Step 2. Paste Your Url anywhere and Add this
For example - Your url is Xyz@blogspot.com now add this last on your Url=http://Xyz@blogsopt.com/sitemap.xml
Step 3. Copy this Url http://Xyz@blogsopt.com/sitemap.xml
And paste on your google search console
After Submit Sitemap you will see your sitemap successful submit
Conclusion
An sitemap is essential for improving your website's performance and exposure on search engines. Your pages are more likely to be correctly indexed and ranked if you give search engines a clear roadmap of your content. If you use Blogger, creating an XML sitemap and posting it to Google Search Console is a simple operation that can greatly aid your SEO efforts. You may increase the search engine visibility of your blog and draw in more organic traffic by following the instructions provided in this tutorial.


0 Comments